
By Randall Light, MD
We are fortunate to be having an annular eclipse on October 14, 2023, and a total solar eclipse on April 8, 2024. This article will focus on understanding and photographing the annular eclipse. There are many excellent current resources to help us understand this eclipse. Photographing it will require significant planning. The eclipse date, time and location, equipment options, and photographic options will be discussed.
The sun is about 400 times the size of the moon. The sun is also about 400 times further away from the earth than the moon. The result is that both the sun and moon appear to be about 0.5° in diameter. Because both the earth and moon have elliptical orbits, the distance between them is variable. In addition, the moon’s orbit is tilted about 5° from the ecliptic, the plane defined by the earth’s orbit around the sun. The points where the moon’s orbit intersects the ecliptic are defined as the ascending and descending nodes. When a new moon and the sun are both near a lunar node, they may line up with the earth to form a total, partial, or annular eclipse. When the moon is further away from the earth, the sun may shine around it and produce an annular eclipse, also known as a ring of fire, as shown in Figure 1.
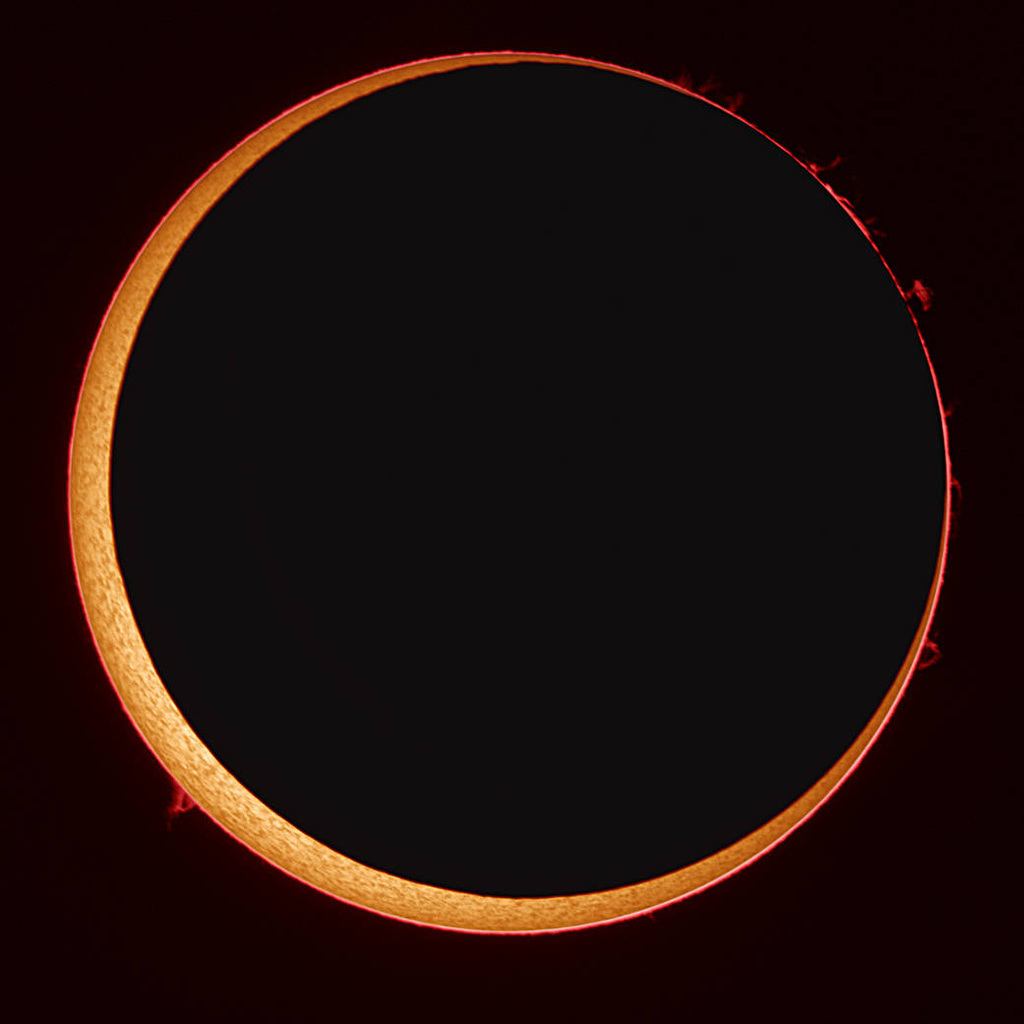
Figure 1
An annular eclipse has five phases, C1-C4 and maximum annularity as illustrated in Figure 2.
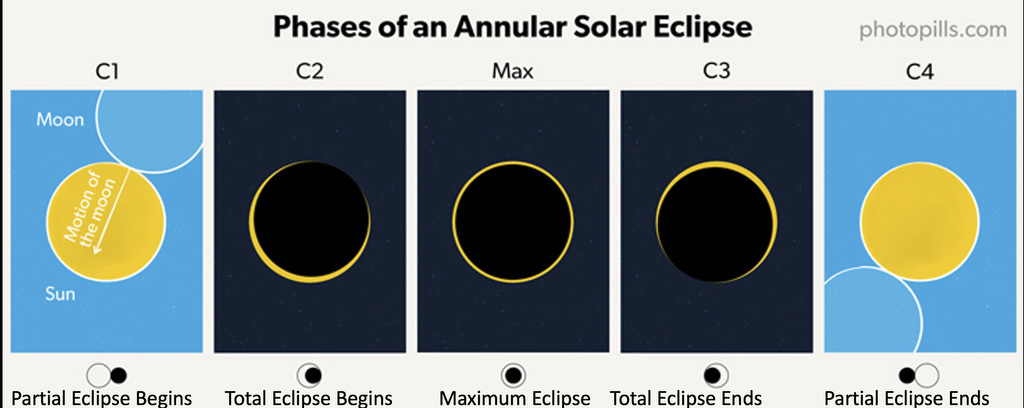
Figure 2
At the end of C2 and just before the beginning of C3 it is possible to see the diamond ring effect and Baily’s beads. The diamond ring effect looks like a flare of light 10-15 seconds before the beginning of annularity or 10-15 seconds just before the end of annularity (Figure 3).
Baily’s beads are a small circle of light caused by the sun shining across the irregular surface of the moon and peeking out between elevated areas. Baily’s beads occur about 5 seconds before the beginning of annularity or 5 seconds just before the end of annularity (Figure 4).
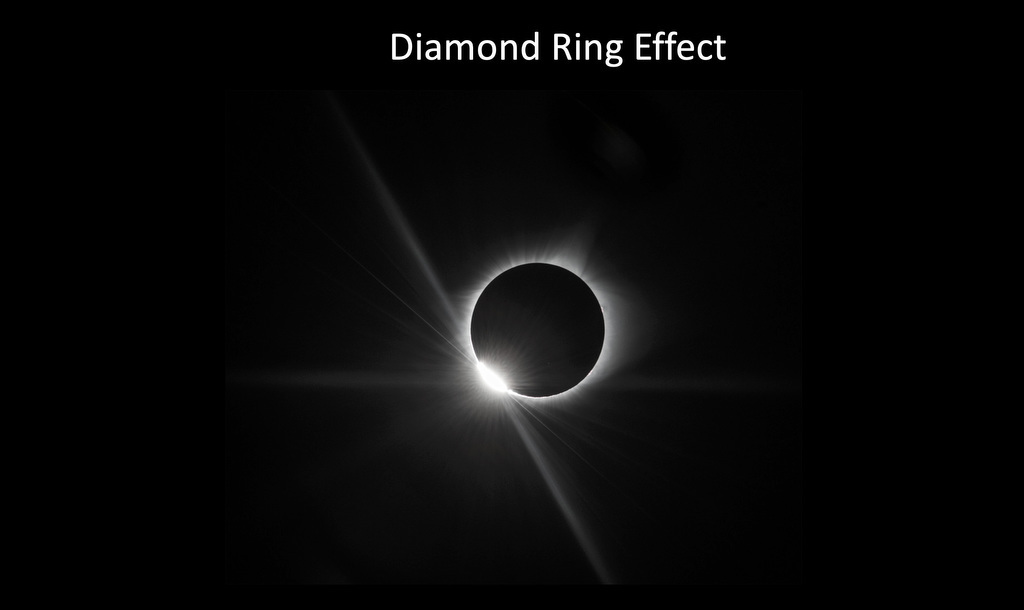
Figure 3
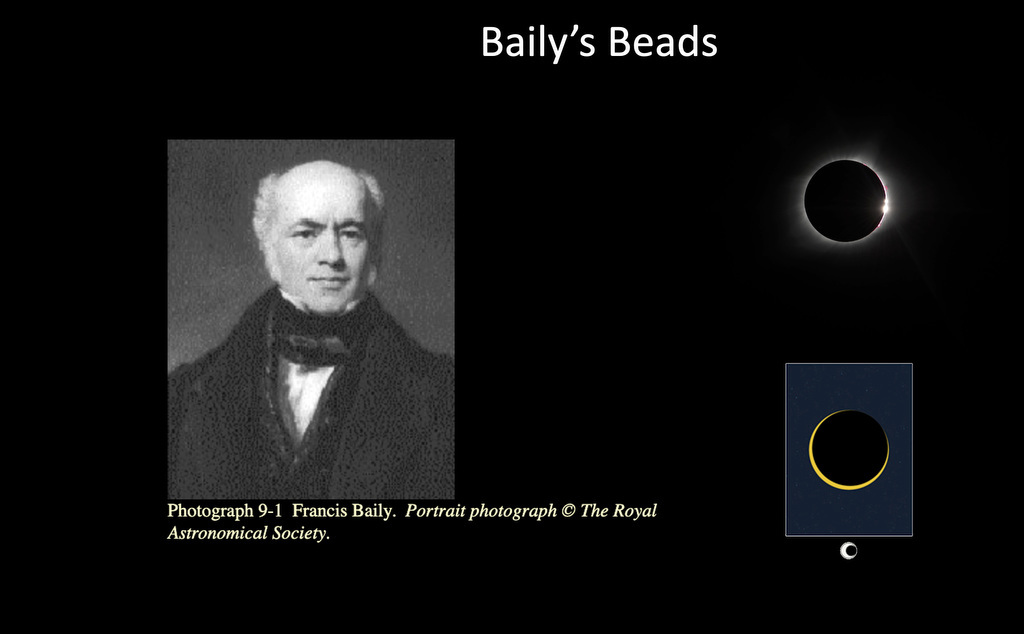
Figure 4
Next, a site to view the eclipse will be selected. There are many sites that show the eclipse path and timing. It is very fortunate that the paths of the annular and the total eclipses will be visible in wide areas of the United States, and the projected paths cross in Texas. Figures 5 & 6.
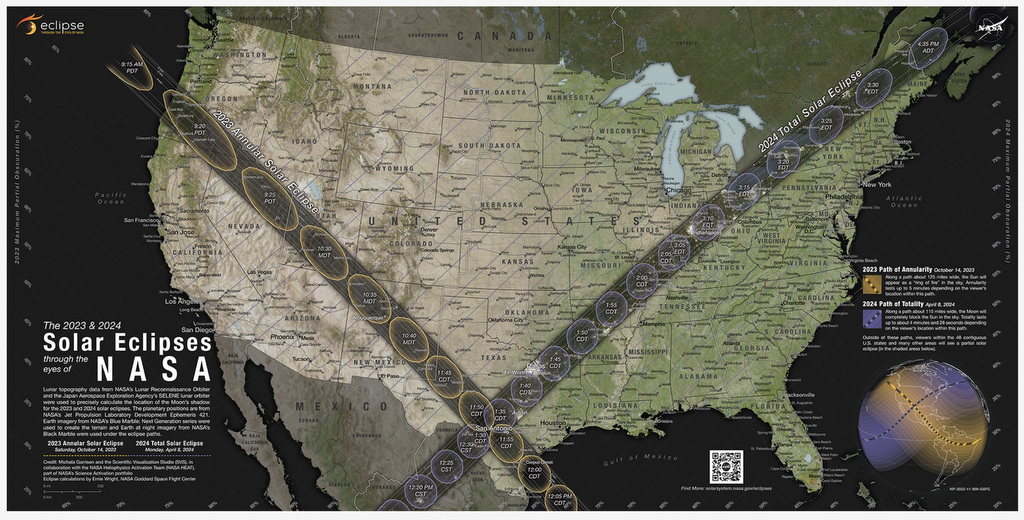
Figure 5
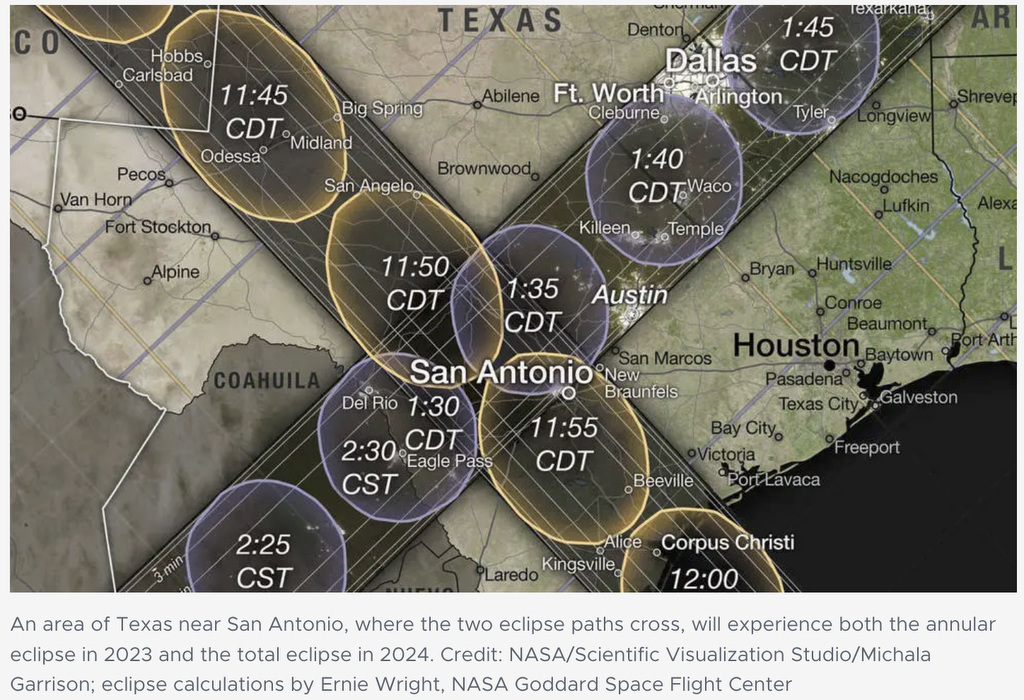
Figure 6
The best sites to see the annular eclipse will be on the line of maximum annularity. This line runs from the Texas coast Northwest through West Texas to New Mexico. The topographic map in Figure 7 shows the elevation increasing along this same line. The weather plays a large role in selecting a location. Average annual cloud cover is higher at the coast and becomes minimal in far West Texas and New Mexico (Figure 8. The annual Eldorado Star Party (ESP) at the X-Bar Ranch includes the date of the annular eclipse and is on the line of annularity.
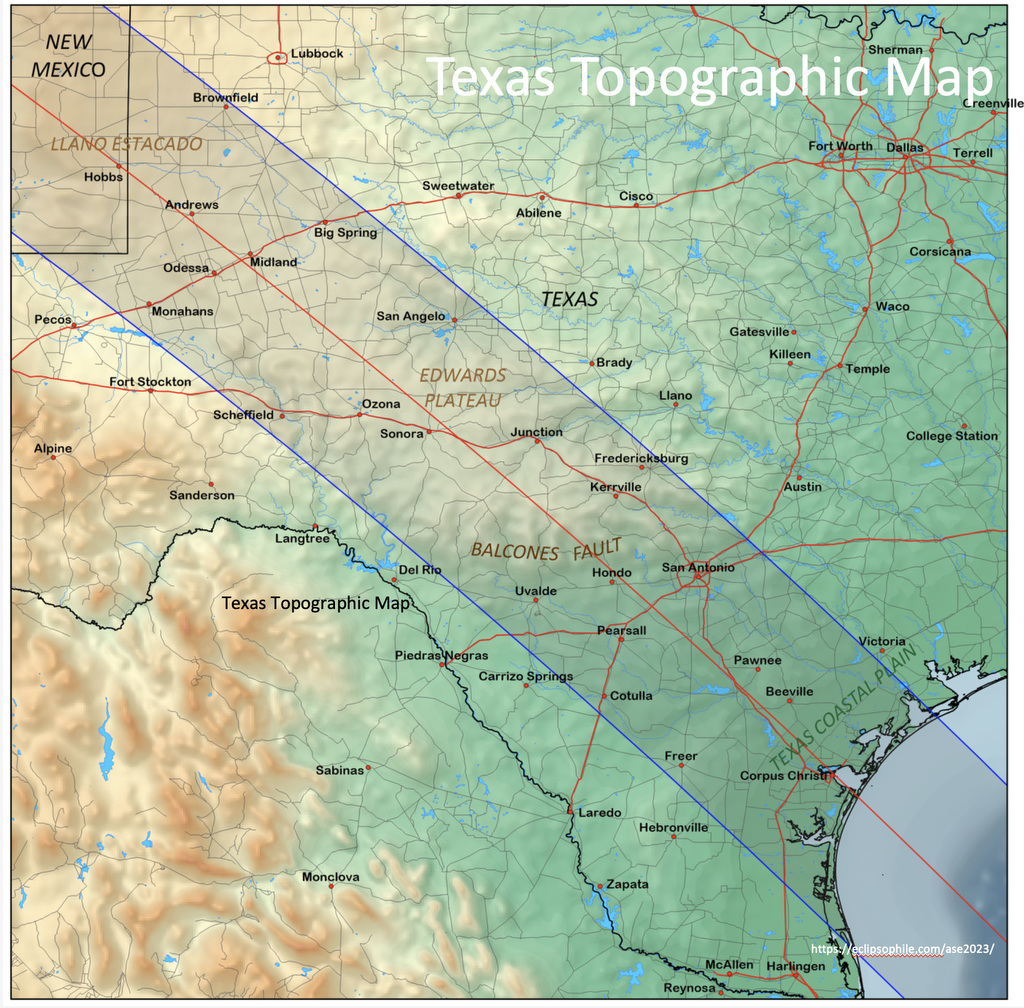
Figure 7
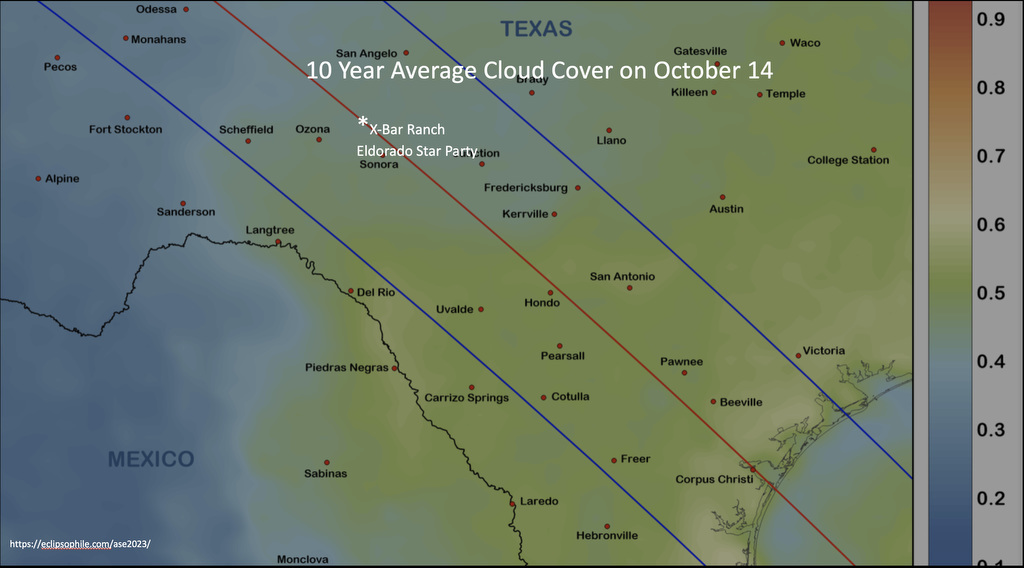
Figure 8
The path of the annular eclipse through West Texas is shown in Figure 9. Based on data collected since 2000, this location has about a 35% change of cloud cover on the annular eclipse date. Bryan/College Station is not on the line of annularity. It will have 85% solar coverage by the moon. It has a 58% chance of cloud cover (Figure 10). The maximum annularity in B/CS will be eccentric.
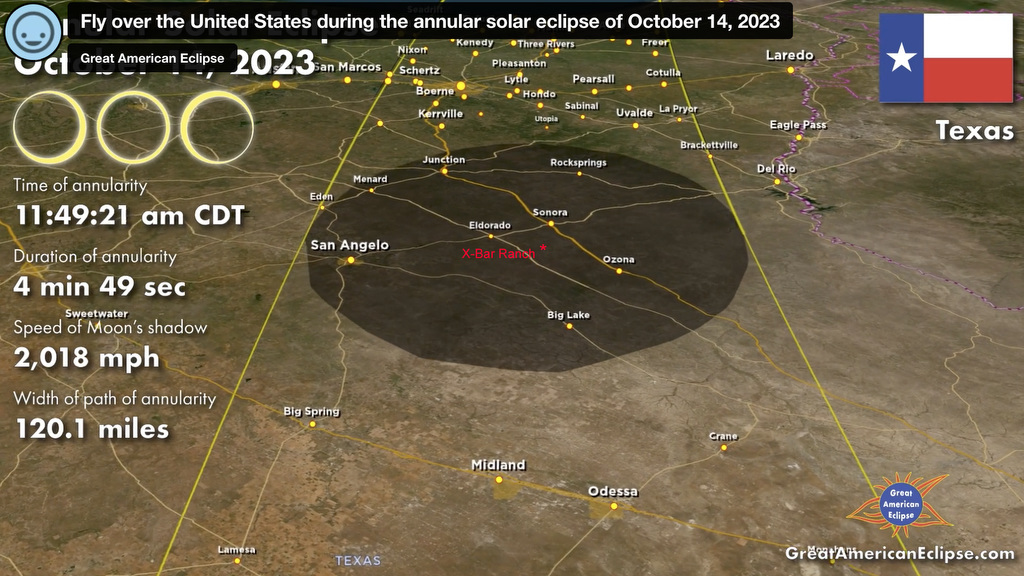
Figure 9
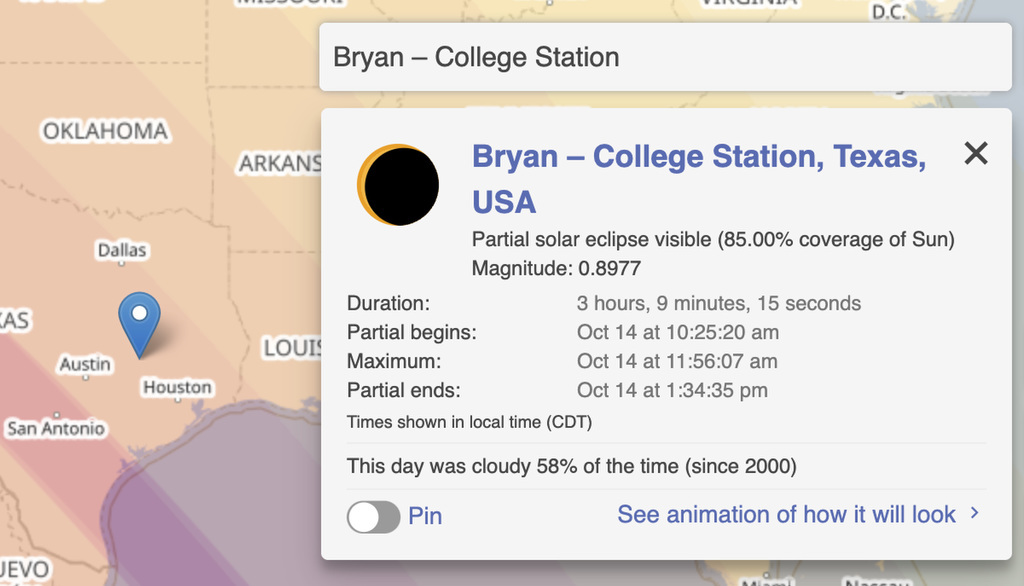
Figure 10
The partial solar eclipse before and after annularity will last about an hour and fifteen minutes. Annularity will last four to five minutes. At the ESP annularity will be from 16:46:38 to 16:51:35 for a total 4m 56.7 seconds of annularity. Maximum annularity will occur at 16:09:06.8 UTC (Figure 11).
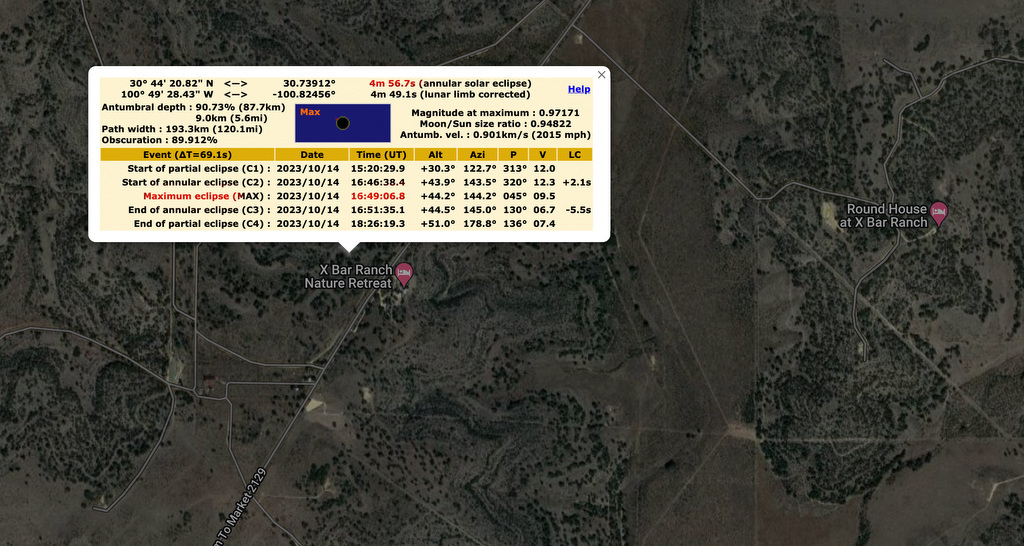
Figure 11
The annular eclipse can be photographed with a wide range of equipment. A typical setup will include a sturdy tripod, tracking mount, or telescope mount (Figure 12). A full frame DSLR or mirrorless camera, a dedicated astrophotography camera, or a cellphone camera can be used. An internal or external intervalometer is needed to make multiple images without causing camera shake. A camera lens or telescope will be selected to obtain the desired field of view and image scale. A solar filter is mandatory.
The single most important item in any setup is the solar filter. It is essential to use a solar filter at the front of the imaging optics to photograph the sun. The annular eclipse does not have a phase of totality, and a solar filter will remain on the camera while pointed at the sun. Protect your vision and equipment with a solar filter (Figure 13).
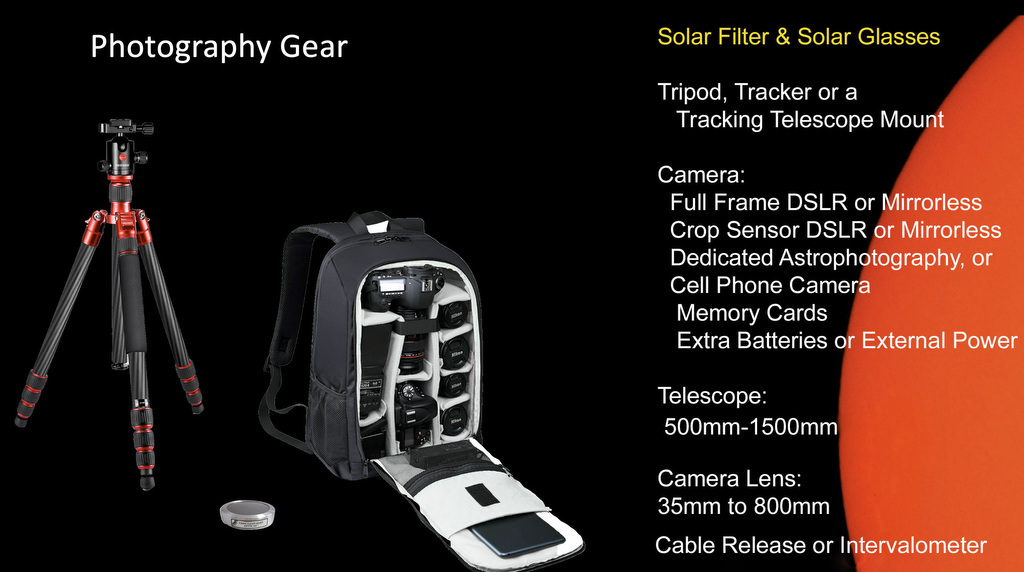
Figure 12
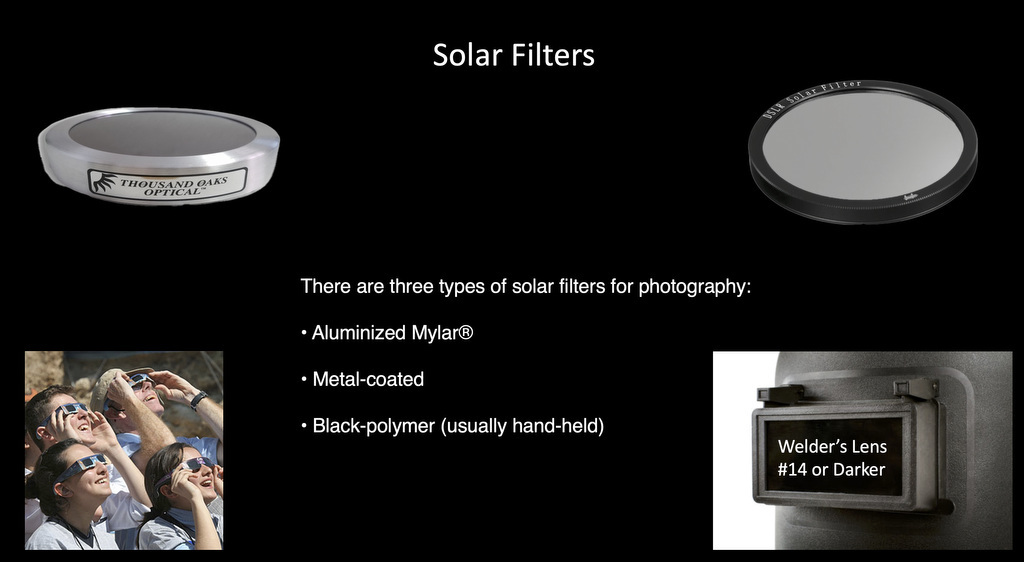
Figure 13
Don’t try to make a filter at home (Figure 14).
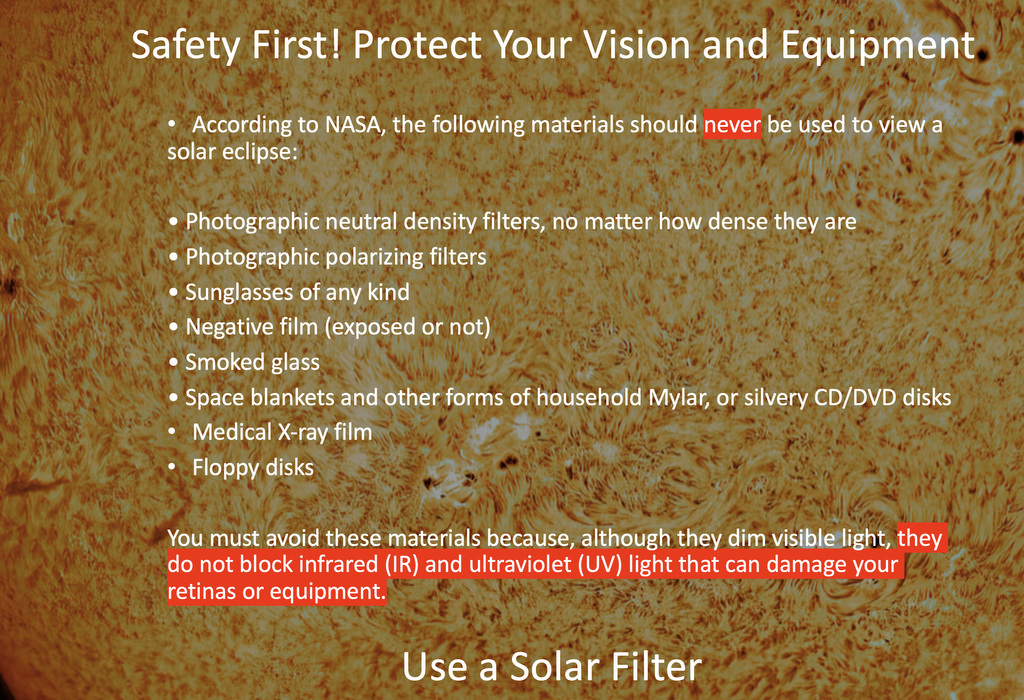
Figure 14
Next, before picking a DSLR or mirrorless camera and other gear, let’s look at simple ways to get images of the annular eclipse. Images from a pinhole camera, pinhole projector, or images projected from an eyepiece, binoculars or a telescope with a solar filter can be safely recorded with any available camera. If a guide camera and guide telescope are fitted with a solar filter, useful annular eclipse images may be obtained.
Selecting a DSLR or mirrorless camera with a larger sensor to photograph the annular eclipse through a telescope or camera lens is preferred. The sensor sizes for various types of cameras are shown in Figure 15. Small sensors cover a smaller area and have a smaller field of view. They also tend to have small pixels and produce more noise. The camera also needs to have manual exposure settings, exposure compensation, and the ability to enable and disable autofocus. Raw files have a higher dynamic range and are preferred over jpg files. Continuous release mode and exposure bracketing will help insure correct exposures. An internal or external intervalometer will allow hands free acquisition of multiple images.
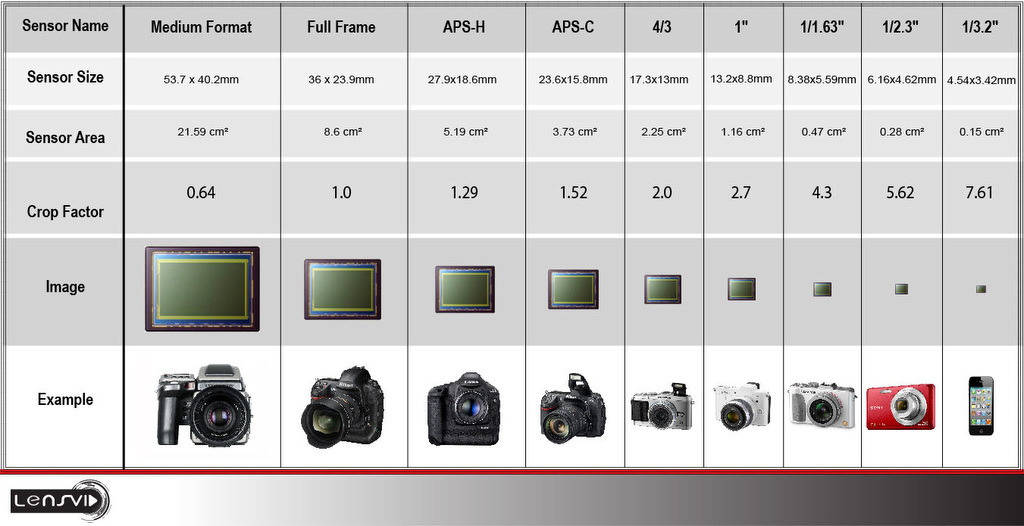
Figure 15
In addition to the camera, a lens or telescope will be selected to fill as much of the frame as possible while also producing an image scale compatible with the seeing conditions. In regular photography our image resolution is diffraction limited by the optics. Astrophotography image resolution is usually seeing limited. Figure 16 shows the eclipse image size and field of view (FOV), vs focal length for various camera sensor types and lens/telescope focal lengths. The same images with the FOV replaced by the image scale are shown in Figure 17. Average seeing is 2”-4”. Above average seeing is 1”-2”.
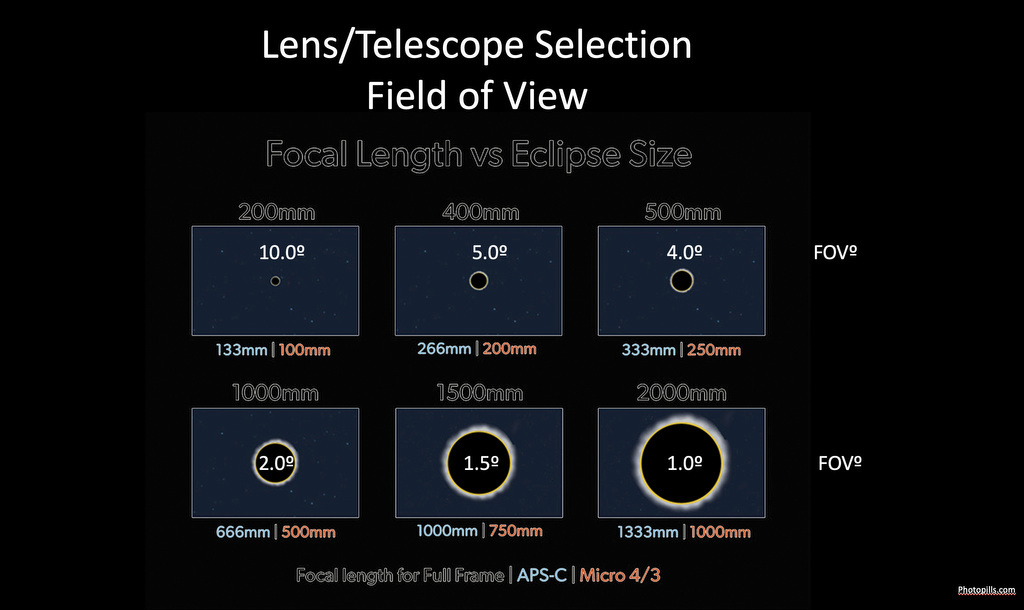
Figure 16
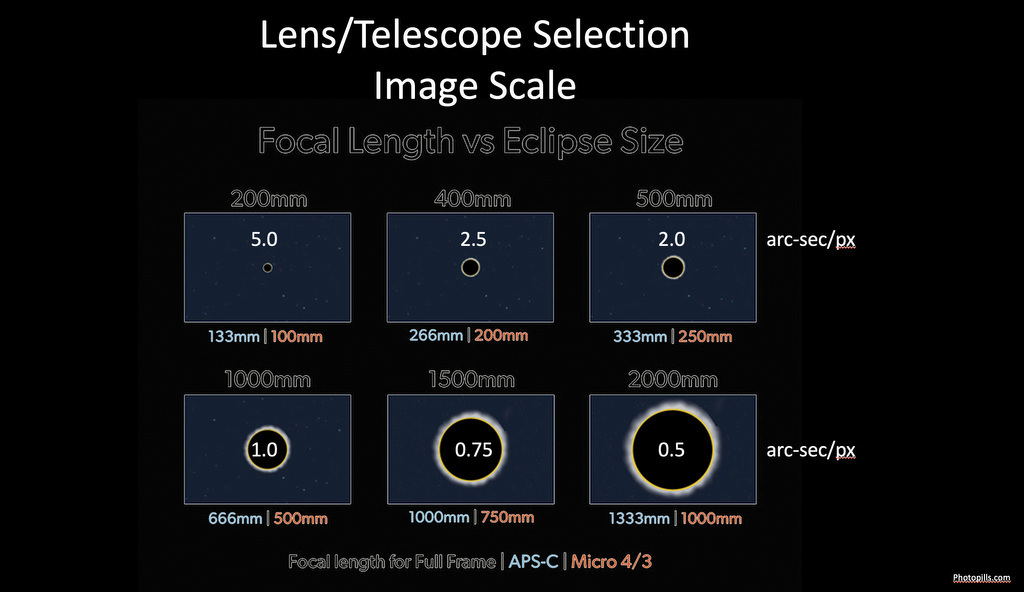
Figure 17
The Nyquist Theorem (Figure 18) says a sampling rate of at least twice the frequency of an analog signal in required to resolve the signal. In astrophotography a sampling rate of two to three times the estimated seeing (FWHM ) is frequently used. For average seeing the image scale would be 0.67 arc-sec/pix – 2.0 arc-sec/pix. From this, we conclude that a lens or telescope with a focal length between 500 and 1500mm on a full frame camera will give us an image that is appropriately sampled. On a crop sensor camera, a lens or telescope with a focal length between 333mm and 1000mm will give the same image scale. The images will be neither over sampled nor under sampled.
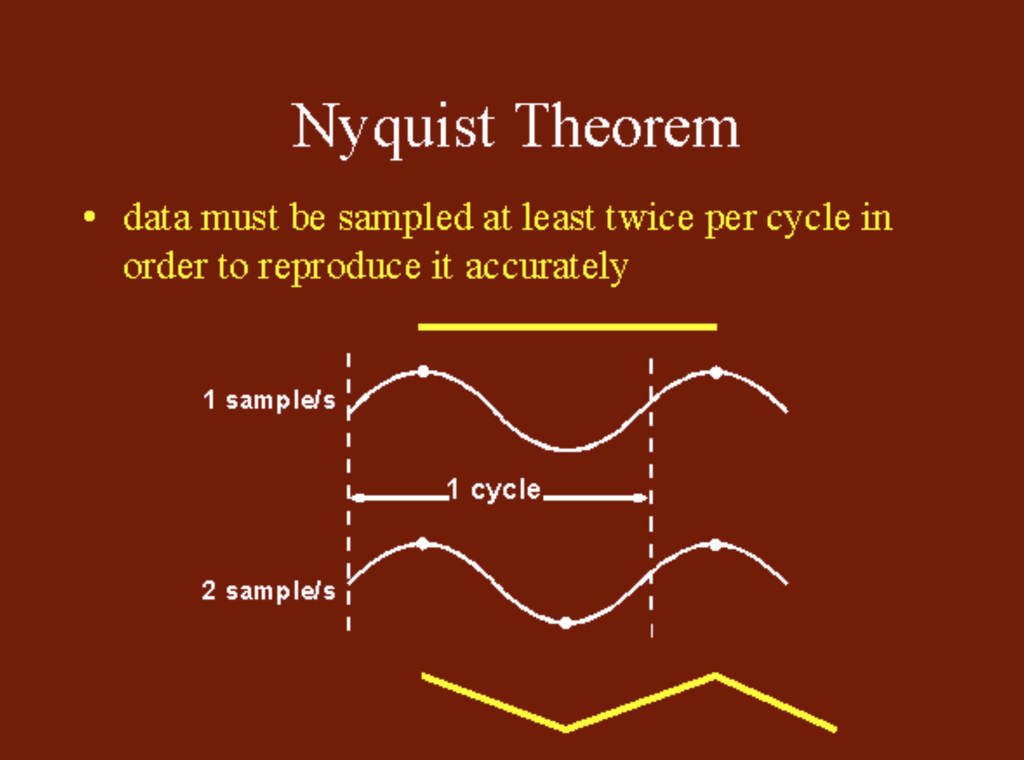
Figure 18
Next, there are some camera menu options that need to be set once. Active D-Lighting, High ISO Noise Reduction, and Long Exposure Noise Reduction should be off for all astrophotography. They slow down acquisition of images and may produce undesired results. Picture Control should be set to Normal. White Balance is set to Daylight. Autofocus will work for an annular eclipse. Select a single or small group focus point and focus on the edge of the sun. If a long focal length lens or telescope is used, the focus can be further refined by focusing on a sunspot. If a solar telescope is used, focusing on a prominence will produce sharp images.
Initial exposure settings are derived from research and experience. They are adjusted based on the results obtained in the field. My initial settings for my full frame camera and 800mm focal length will be ISO 400, f/8, 1/500 second. Adjustments will be made based on the histogram. A histogram shows how many pixels are a certain brightness. Information is lost from the image if the image is not clear of the left and right sides of the graph. A correct exposure histogram is shown in Figure 19. A histogram shifted toward black (the left side of the graph) indicates an underexposed image as shown in the upper image in Figure 20. A histogram shifted toward white (the right side of the graph) indicates an overexposed image as also shown in the lower image in Figure 20.
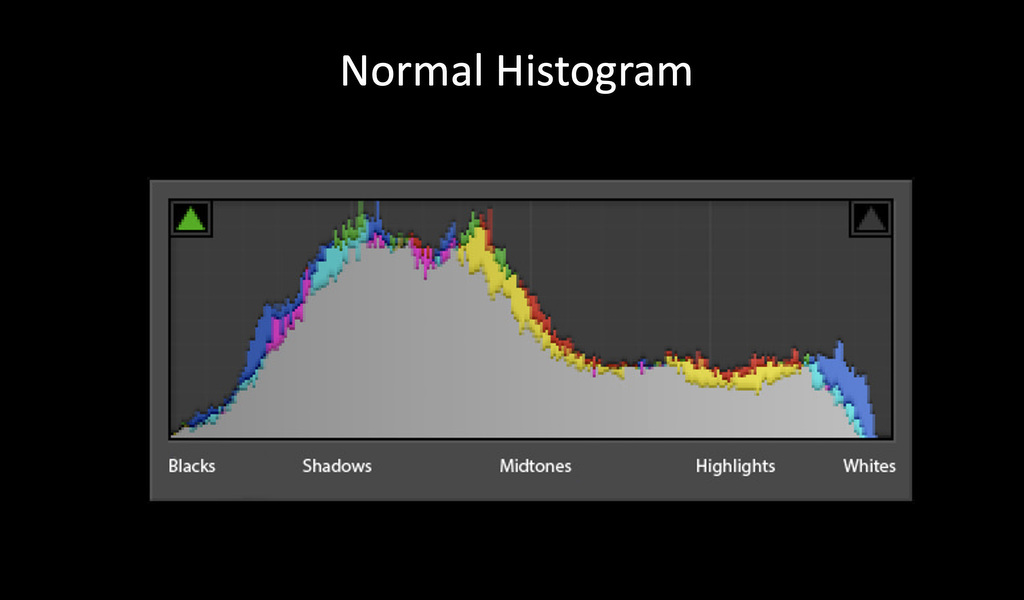
Figure 19
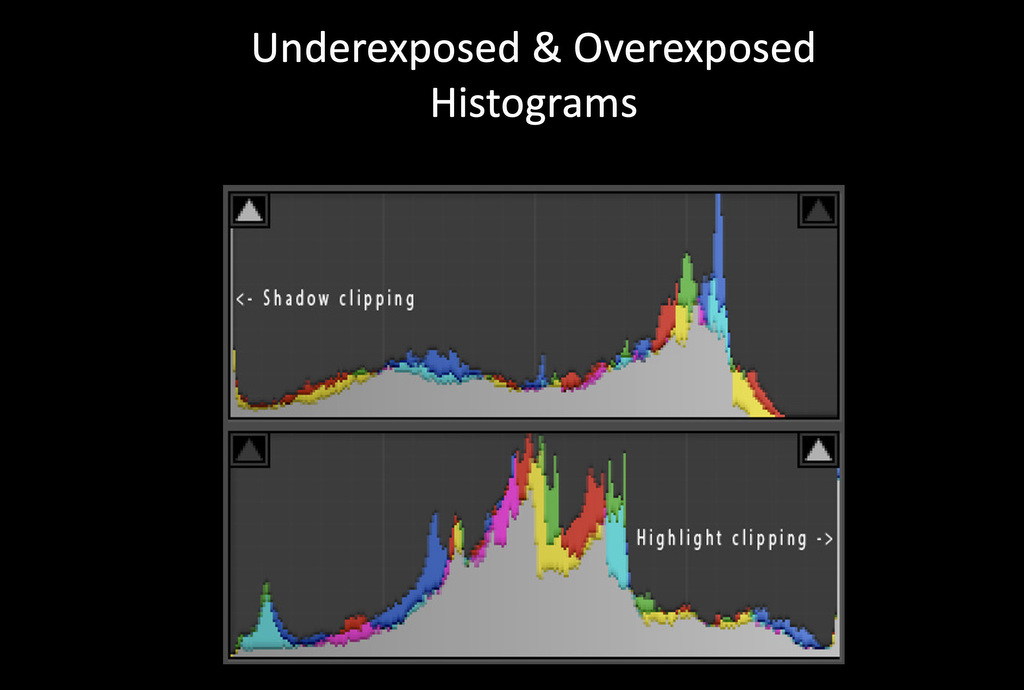
Figure 20
A correctly exposed image from the 2017 solar eclipse and the associated histogram is shown on the left side of Figure 21. The sliver of sunlight seen on the right side of that image was made with the same exposure settings and is only slightly underexposed. Bracketing exposures can help get the best exposures.
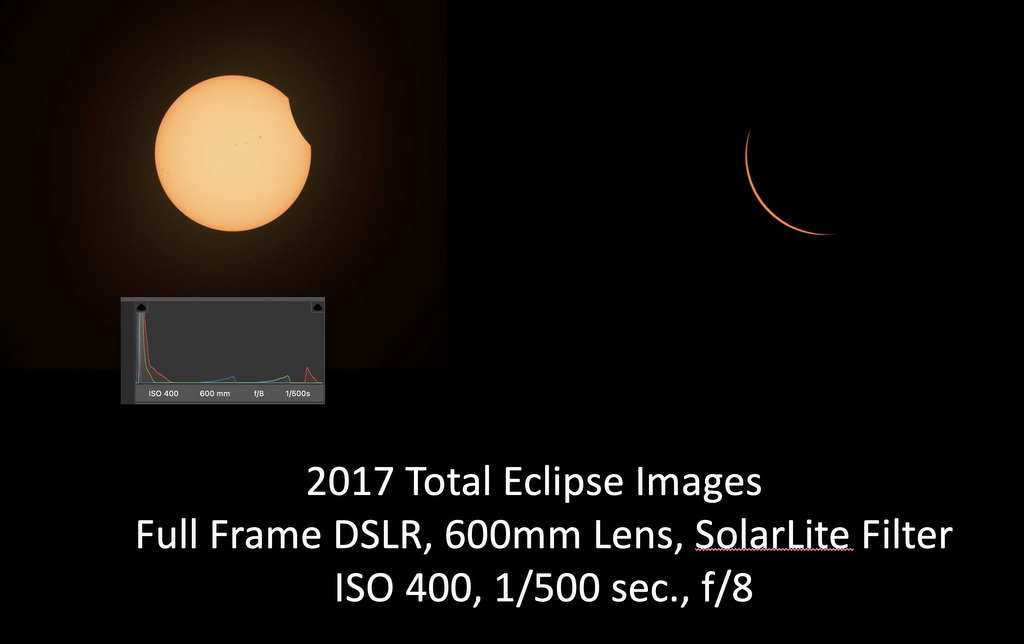
Figure 21
There are numerous types of images that can be made with the annular eclipse. These include single images at or near annularity, layered composite eclipse sequences of annularity, layered composite eclipse sequences of all or any part of the eclipse as shown in Figures 22-25. Suggested exposure settings for a full frame camera are included. These settings can be adjusted for other sensor or lens sizes. The layers are created and blended in Photoshop or a similar program.
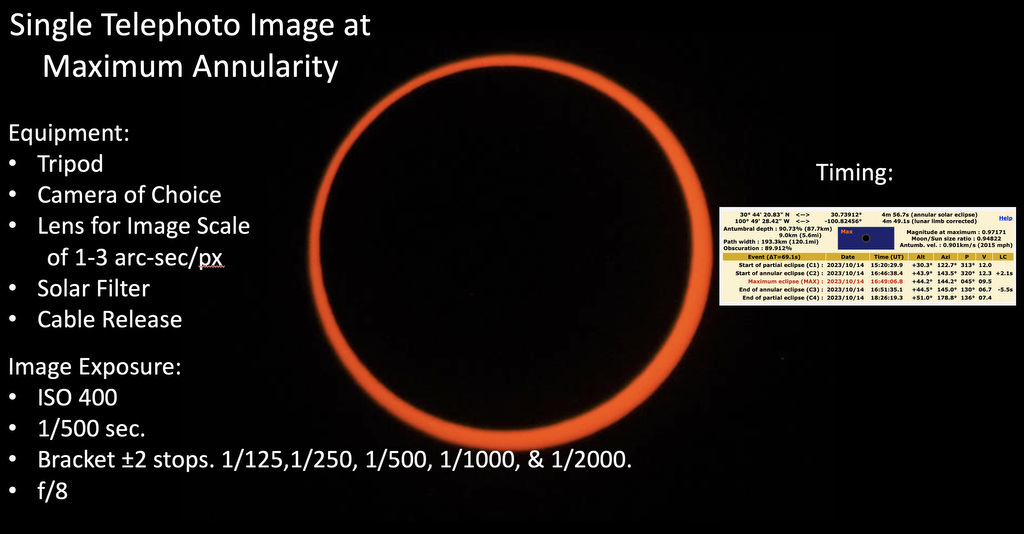
Figure 22
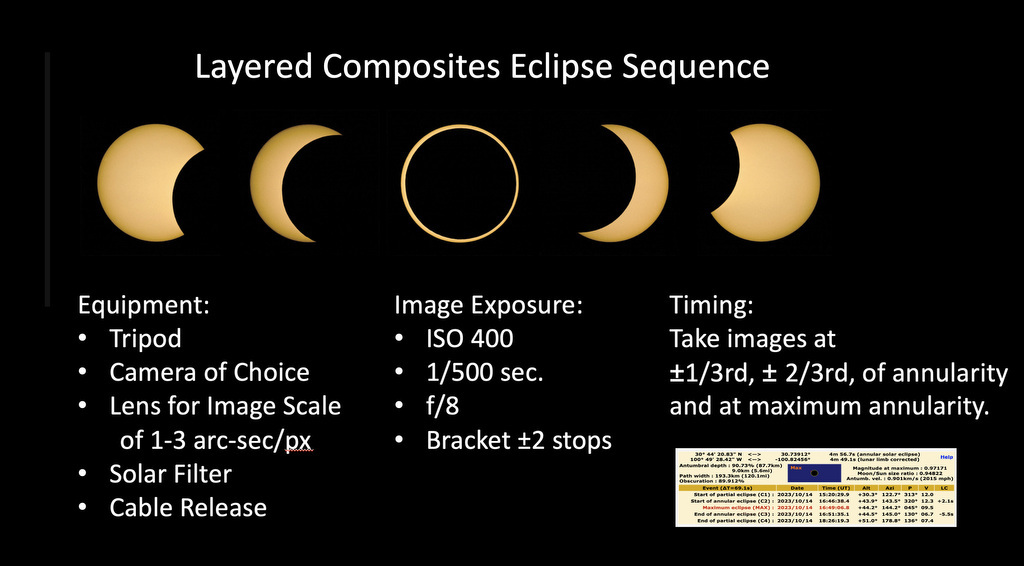
Figure 23
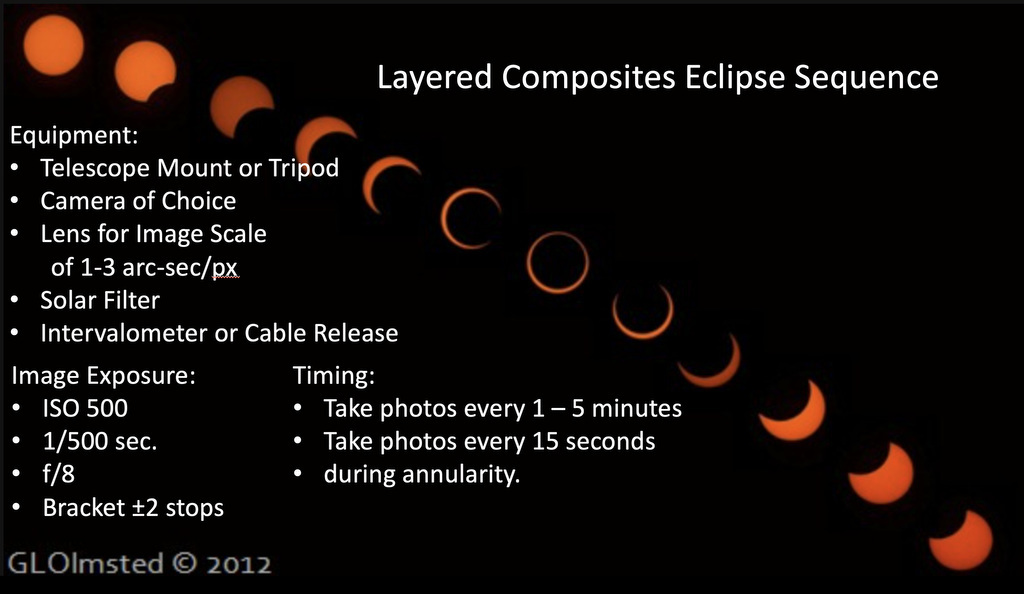
Figure 24
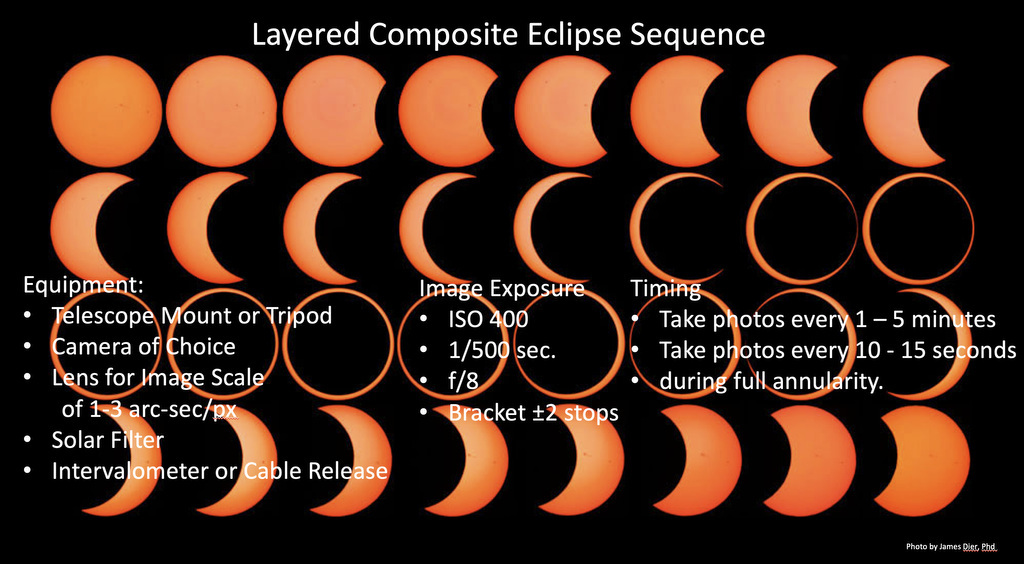
Figure 25
The diamond ring effect and Baily’s beads are illustrated again in Figure 26 with suggested initial settings. A wide field landscape image is shown as a base image with additional images exposed for the eclipse sequenced combined with the base image in Photoshop or similar software in Figure 27.
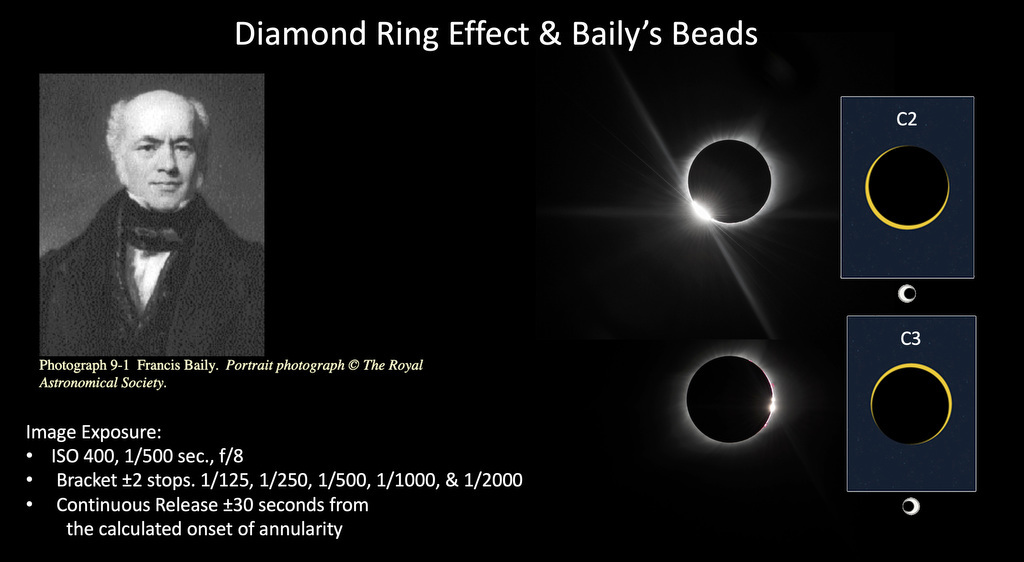
Figure 26
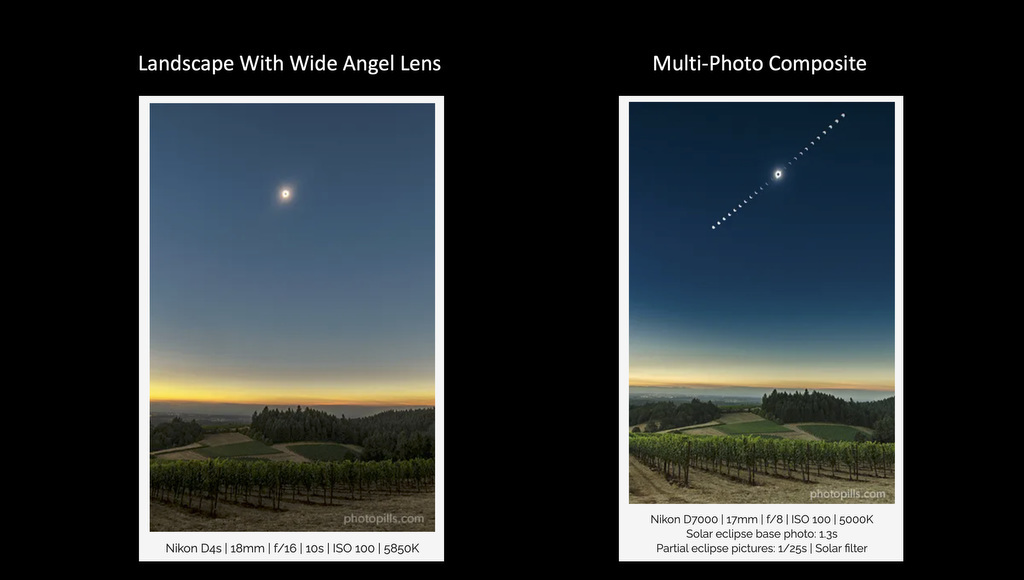
Figure 27
A perspective controlled telephoto image can be quite striking. The PhotoPills Rule of 100 is used to obtain the correct distance from the foreground subject to balance the size of the foreground object and the size of the sun. If you want the size of the sun to be equal to the size of the foreground object move back 100 times the size of the foreground object. If you want the sun to be some fraction of the size of the foreground object multiple that fraction times the previous calculation. The FOV is then determined, and a lens is selected (Figure 29).
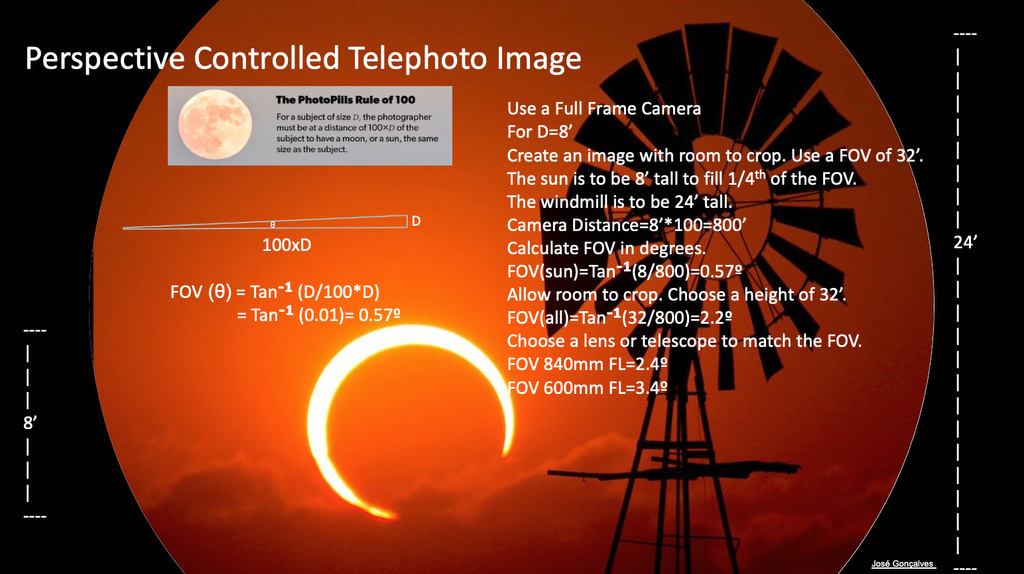
Figure 28
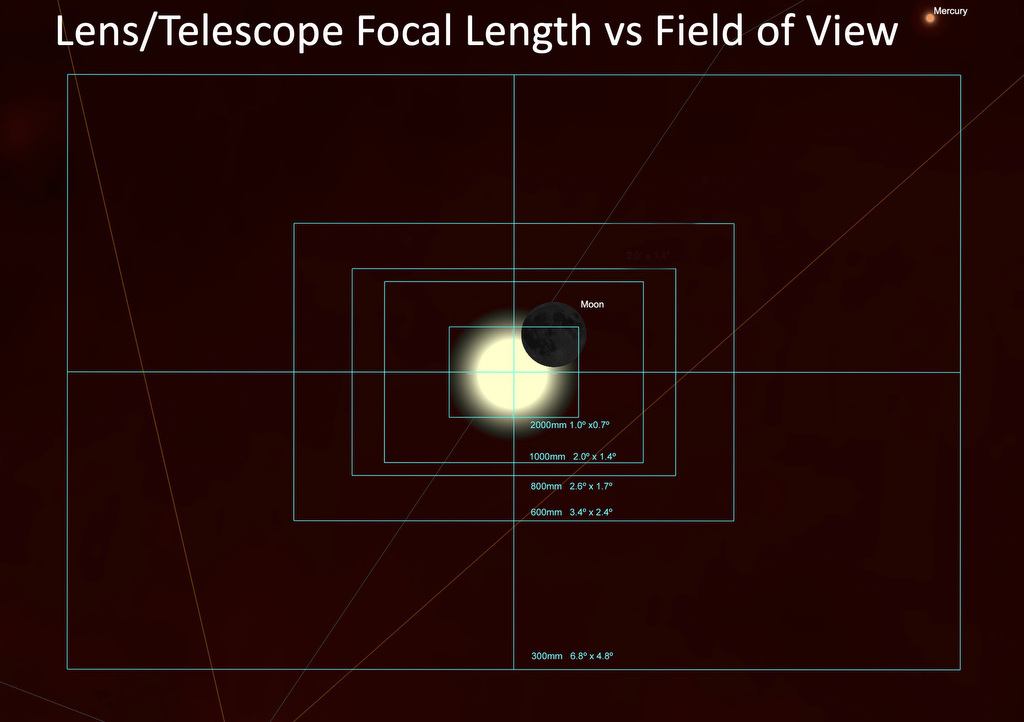
Figure 29
Suggested equipment, distance and initial exposure setting are shown in Figure 30.

Figure 30
There are two cellphone applications that can significantly help you plan and photograph the annular and total eclipses. They are PhotoPills and Solar Eclipse Timer. Links to these applications are listed in the references.
In summary, understanding the characteristics of an annular eclipse helps to plan annular eclipse photos. The path of the eclipse, topology, weather, timing, and equipment can be selected to create the desired image. Various types of eclipse images require careful planning and preparation. Each image composition differs from the other images in important ways. Before the eclipse, practice photographing the sun and moon at home. If the event that conditions at your preferred location are not favorable, have an alternate location planned as a backup. If clouds unexpectedly appear, keep shooting (Figure 31). Take time to safely look at the annular eclipse. Have fun. Please share your photos.
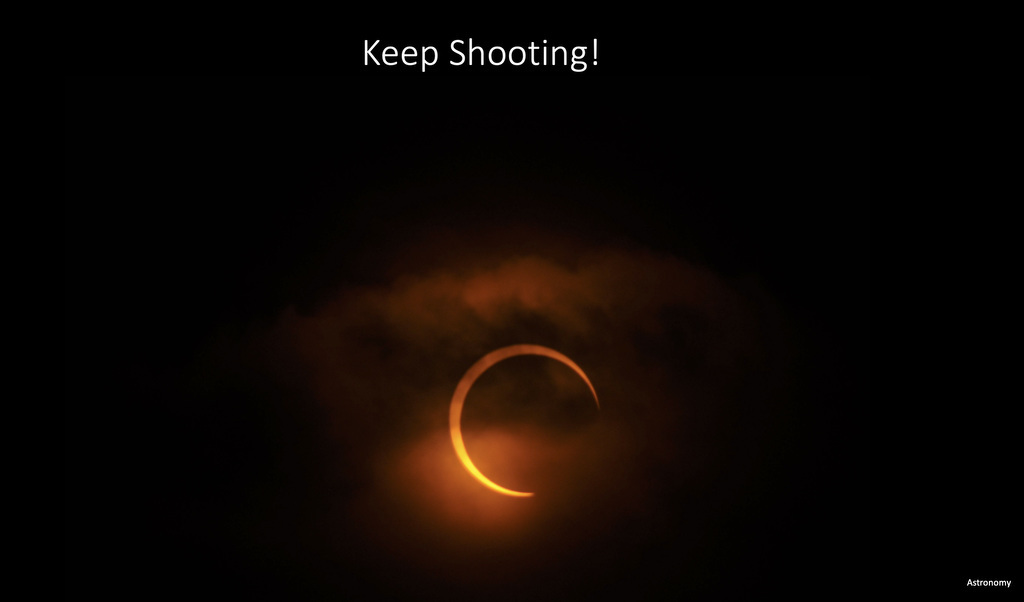
Figure 30
About the Author:
Randy is a retired medical neurologist who became a photographer in 1979 and an astrophotographer in 2013 when he retired. He has written articles, given talks, and received awards for his astrophotography.
Website: https://RandallLight.com
Summer 2023 Newsletter

CONTACT EMAIL:
contact@brazosvalleyastronomyclub.org
Coordinator - Randy Light, M.D.
PROGRAM REQUEST EMAIL:
outreach@brazosvalleyastronomyclub.org
Coordinator - Tom Campbell
GOOGLE DISCUSSION GROUP:
https://groups.google.com
Coordinator - Randy Light, M.D.
WEBSITE AND NEWSLETTER EMAIL:
webmaster@brazosvalleyastronomyclub.org
Coordinator - Ginger Wentrcek
Follow Us on Facebook
Member: Astronomical League
Member: Night Sky Network
BVAC Website:
https://brazosvalleyastronomyclub.org
© Brazos Valley Astronomy Club
The Brazos Valley Astronomy Club is a non-profit group
located in Bryan-College Station, Texas.
Our goal is to promote astronomy and related science
as a hobby for people of all ages.